Hamann Manus · Volume 6
Care, Repair and Restoration
The Manus has a reputation among repairers, and it is not a good one. Detlev Bölter, restoring a Manus E, was told by an office-machine mechanic that his firm “always steered clear of the Hamann … the machines were usually sent back to the factory.” Cris Vande Velde, writing about his own model C, warns that “many an amateur has accidentally taken it apart, and subsequently never succeeded in putting it back together. These machines are so alien to the aficionado of pinwheel calculators that making this mistake is easy.” None of this makes a Manus unrepairable. It means the order of work matters: diagnose first, clean in place, and take out the drum only as a last resort.
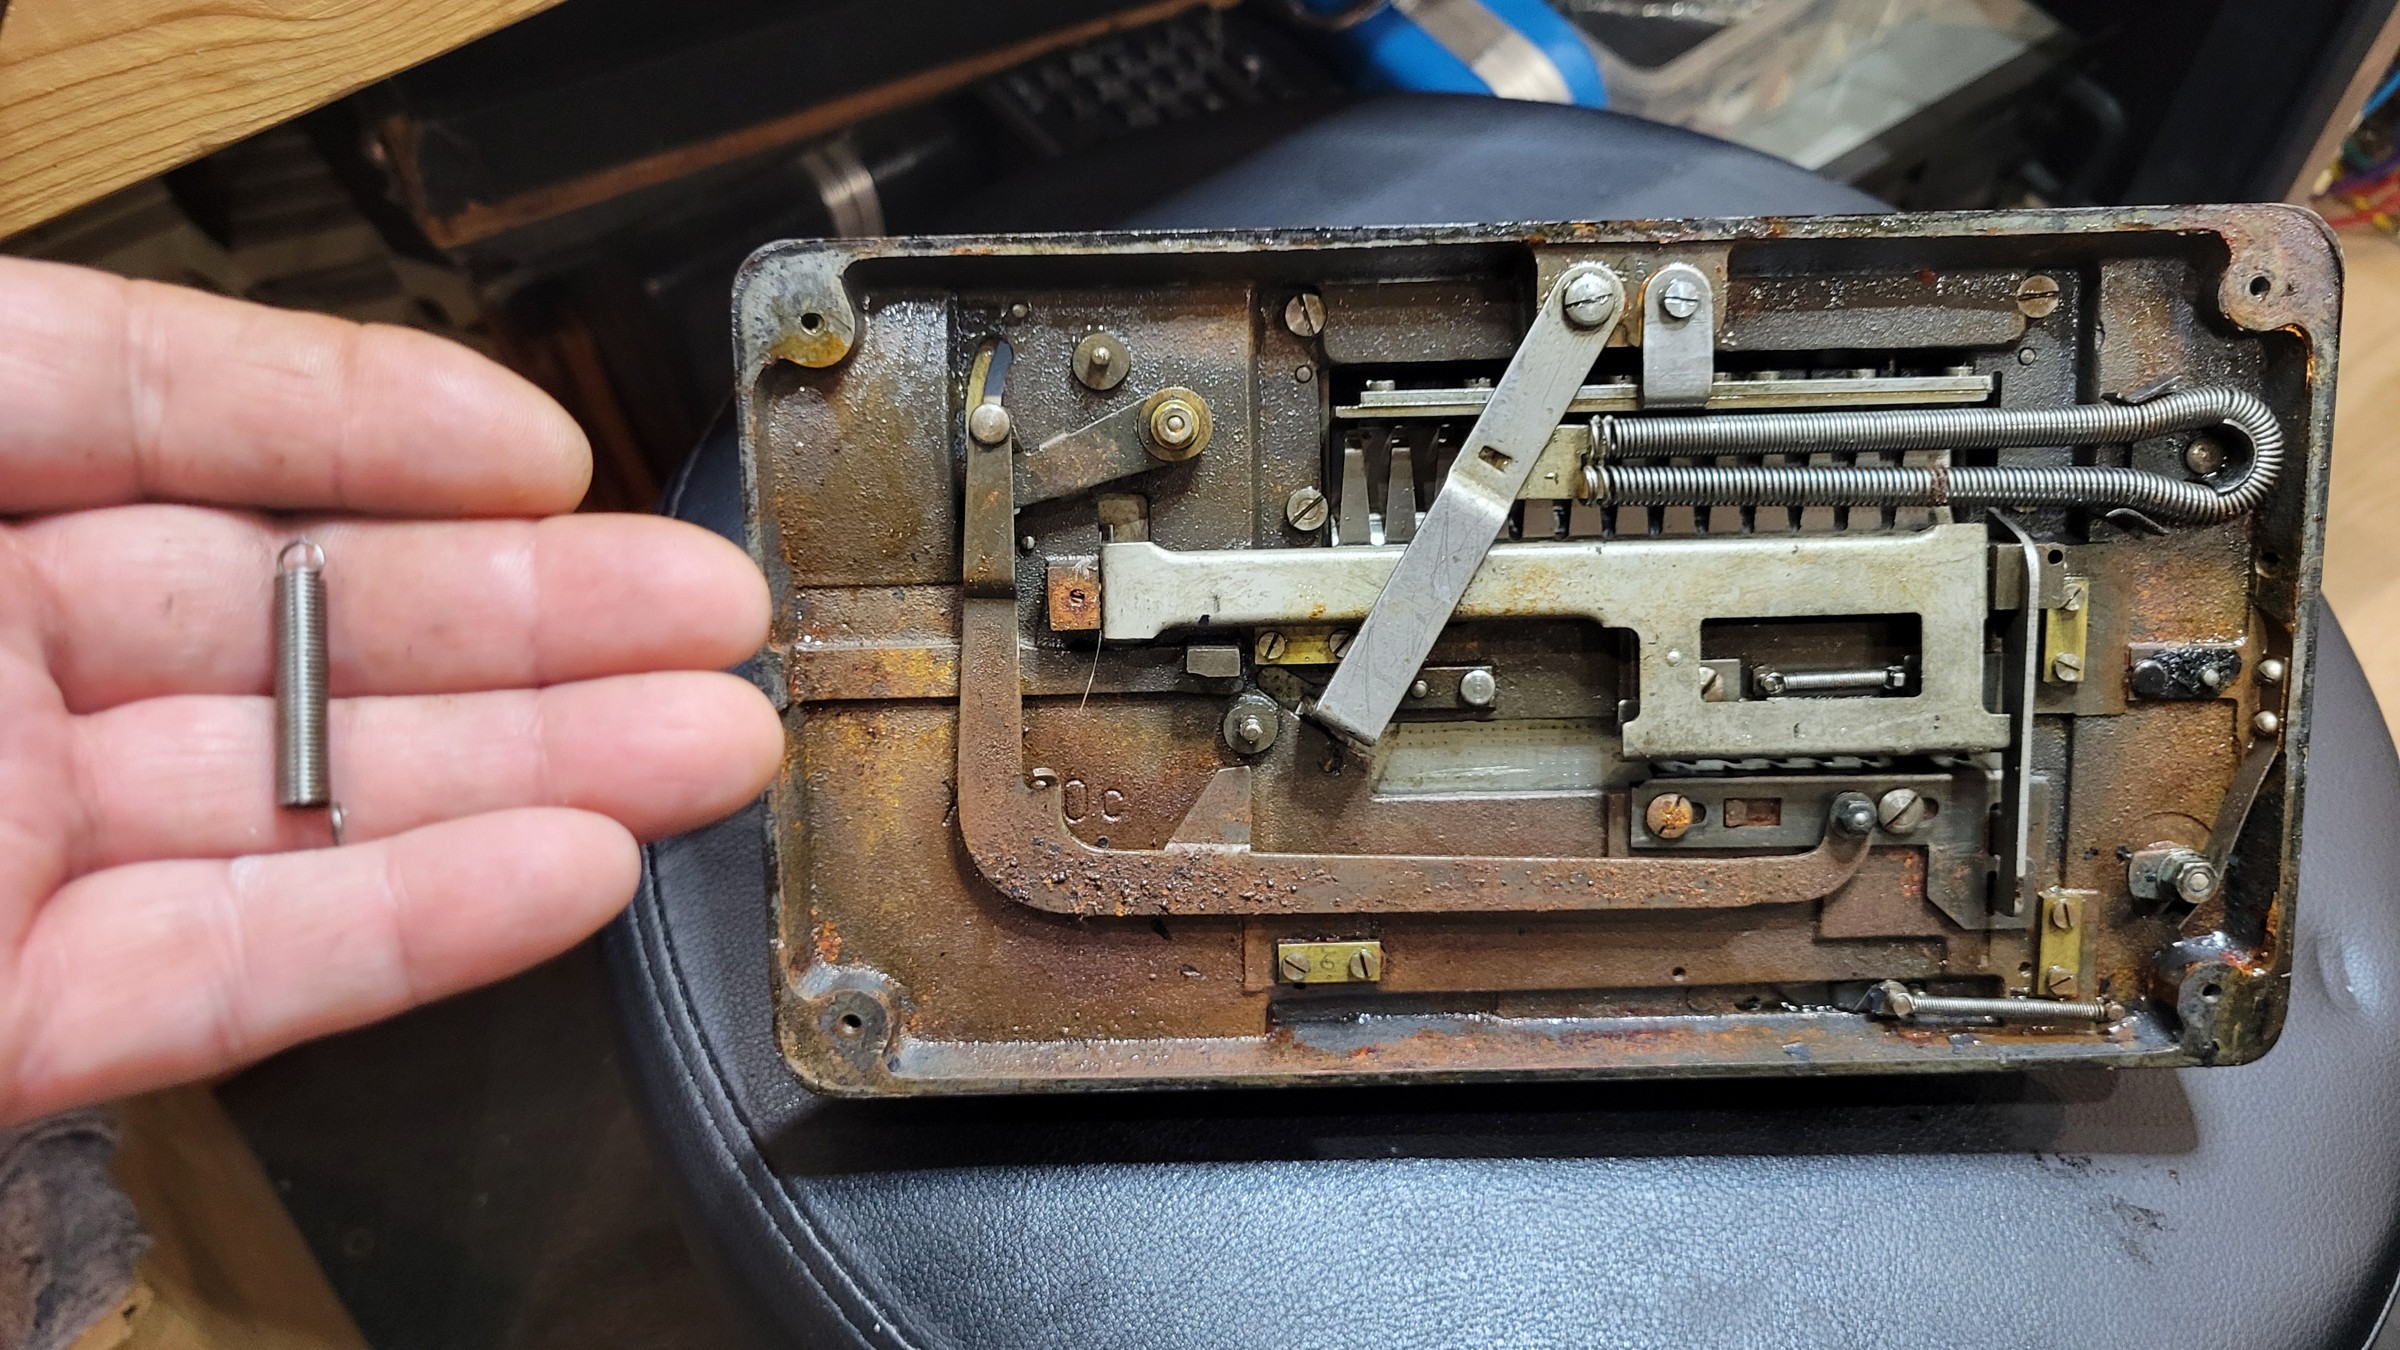
My machine tends to jam, and when I took off the bottom pan a small spring fell out. This volume is the plan for putting it right.
6.1 The factory’s warnings
The factory did not want owners inside the machine. The 1953 Manus R manual: Das Ölen des inneren Werkes oder sonstige Eingriffe in den Mechanismus sind nach den Garantiebedingungen zu unterlassen, “under the terms of the guarantee, oiling the inner works or any other interference with the mechanism is not permitted.” Cleaning and oiling were for the dealer or the factory. The English translation of the earlier manual adds that the machine “should be protected from dust and moisture by the enclosed wax-cloth cover” when not in use.
The rule that matters most for a jammed machine is the factory’s rule about force:
The “Hamann Manus” is equipped with various enforced locks and safety features that are activated when operating errors occur. In such cases no form of force should be used to release the locks.
Christian Hamann’s Manus R arrived with its counter-clearing axle sheared off, after a previous owner forced a clearing lever against a lock.
6.2 Before taking anything apart: diagnosing a jam
The theory volume explains the locks. A Manus that seems seized is usually being held by one of them, not broken. Work through these first, gently.
- Is the crank at rest in its holder? Clearing, carriage moves and most control changes are only possible with the crank down and locked.
- Is the crank stuck part-way round? From the model B, a small release tab near the crank lets it be turned back to its rest position. The manual says this is the only time it may be turned anticlockwise. Press the tab and back the crank out; do not force it forwards.
- Is the drum off zero? The Automat S repair manual, which covers the same system, explains: Ist die Maschine blockiert und ist dabei die Systemwalze angedreht … dann kann auch der Schlitten … nicht bewegt werden. If the machine is blocked with the drum partly turned, the carriage cannot be moved either, because a safety slider has dropped into its rail. The cure, with the base plate off, is to push the shutter openers back with a narrow instrument. Then the drum can be turned back to zero and the carriage moves again.
- Is the carriage in the clearing position? On a model C, at the far left, no calculation is possible, and the carriage will not leave that position until the result register has been cleared.
- Is the division lock in? Pushed in, it changes how the carriage behaves when the result overdraws.
- Are the setting levers between digits? A lever left between two notches can stop its place mid-turn.
If none of these frees it, the cause is almost certainly old oil.
6.3 Why old Hamanns jam
John Wolff’s guide to overhauling mechanical calculators puts it bluntly: “Most problems in a jammed or malfunctioning machine are due entirely to the oxidation and decay of the lubricating oil. The oil dries and hardens with age.”
On a switching-latch machine that has particular effects, because so much of it works by small springs moving light parts:
- Gummed pawls and rollers. The pawl in each place is pushed into the gap by a weak spring. If old oil holds it, the pawl does not drop, and that place adds too little or nothing.
- Gummed locking pawls. If the locking pawl cannot snap back, the wheel coasts, and the place adds too much. This is overthrow.
- Sticky shutter openers and carry levers. Carries are skipped or doubled.
- Sticky setting segments. The levers feel stiff or will not return to zero when the knob is pressed.
- A stiff carriage guide. The carriage fails to step in division, or hangs between positions.
On a well-kept Manus, the vintage-calculators.nl restorer notes, the division “runs very smoothly, also when underflow occurs and a step is made.” A machine that grinds, stalls or needs force is telling you where it is dirty.
6.4 The factory’s fault table
The Automat S repair manual (Hamann Rechenmaschinen GmbH, about 1955) is the only factory service document for this system I have found online. Its fault table applies to the drum of any switching-latch Hamann. One of its technical notices, on adjusting the locking levers, names the Manus and Manus R explicitly.
Table 1 — The factory's fault table
| Fault | Factory’s causes |
|---|---|
| Overthrow (adds or subtracts too much) | locking lever no longer holds a drum wheel; a result wheel’s nose sticks (free it “with a knife or by light tapping”); broken shutter-opener tab; bent carry lever in the carriage; worn or sticking pawl; broken spring; too much side play on the carriage wheels |
| Skipped carry (too little) | more than 0.1 mm play between a carriage carry lever and its shutter opener; the pawl’s roller rubbing the shutter opener (straighten “with narrow flat pliers”); a sticking pawl; a weak detent spring |
| Wrong division | broken leaf spring on the division lever; weak division-rack spring; a counter wheel overthrowing |
| Carriage hangs | broken nose on the safety slider; bent intermediate lever |
| Counter blocked | a counter wheel overthrown by half a step, after several carries at once |
On a sticking pawl the manual adds a warning that applies to any work on the drum: free it “with a narrow tool, taking care not to damage the spring or loosen the pawl rivet.”
Its adjustment figures:
- 12° of offset from place to place on the drum shaft.
- An exact 8 mm pitch between places, set by shims that must go back where they came from.
- A very tight end nut, so the places cannot work loose on their key.
- At most 0.1 mm of play between a locking cam and its curve.
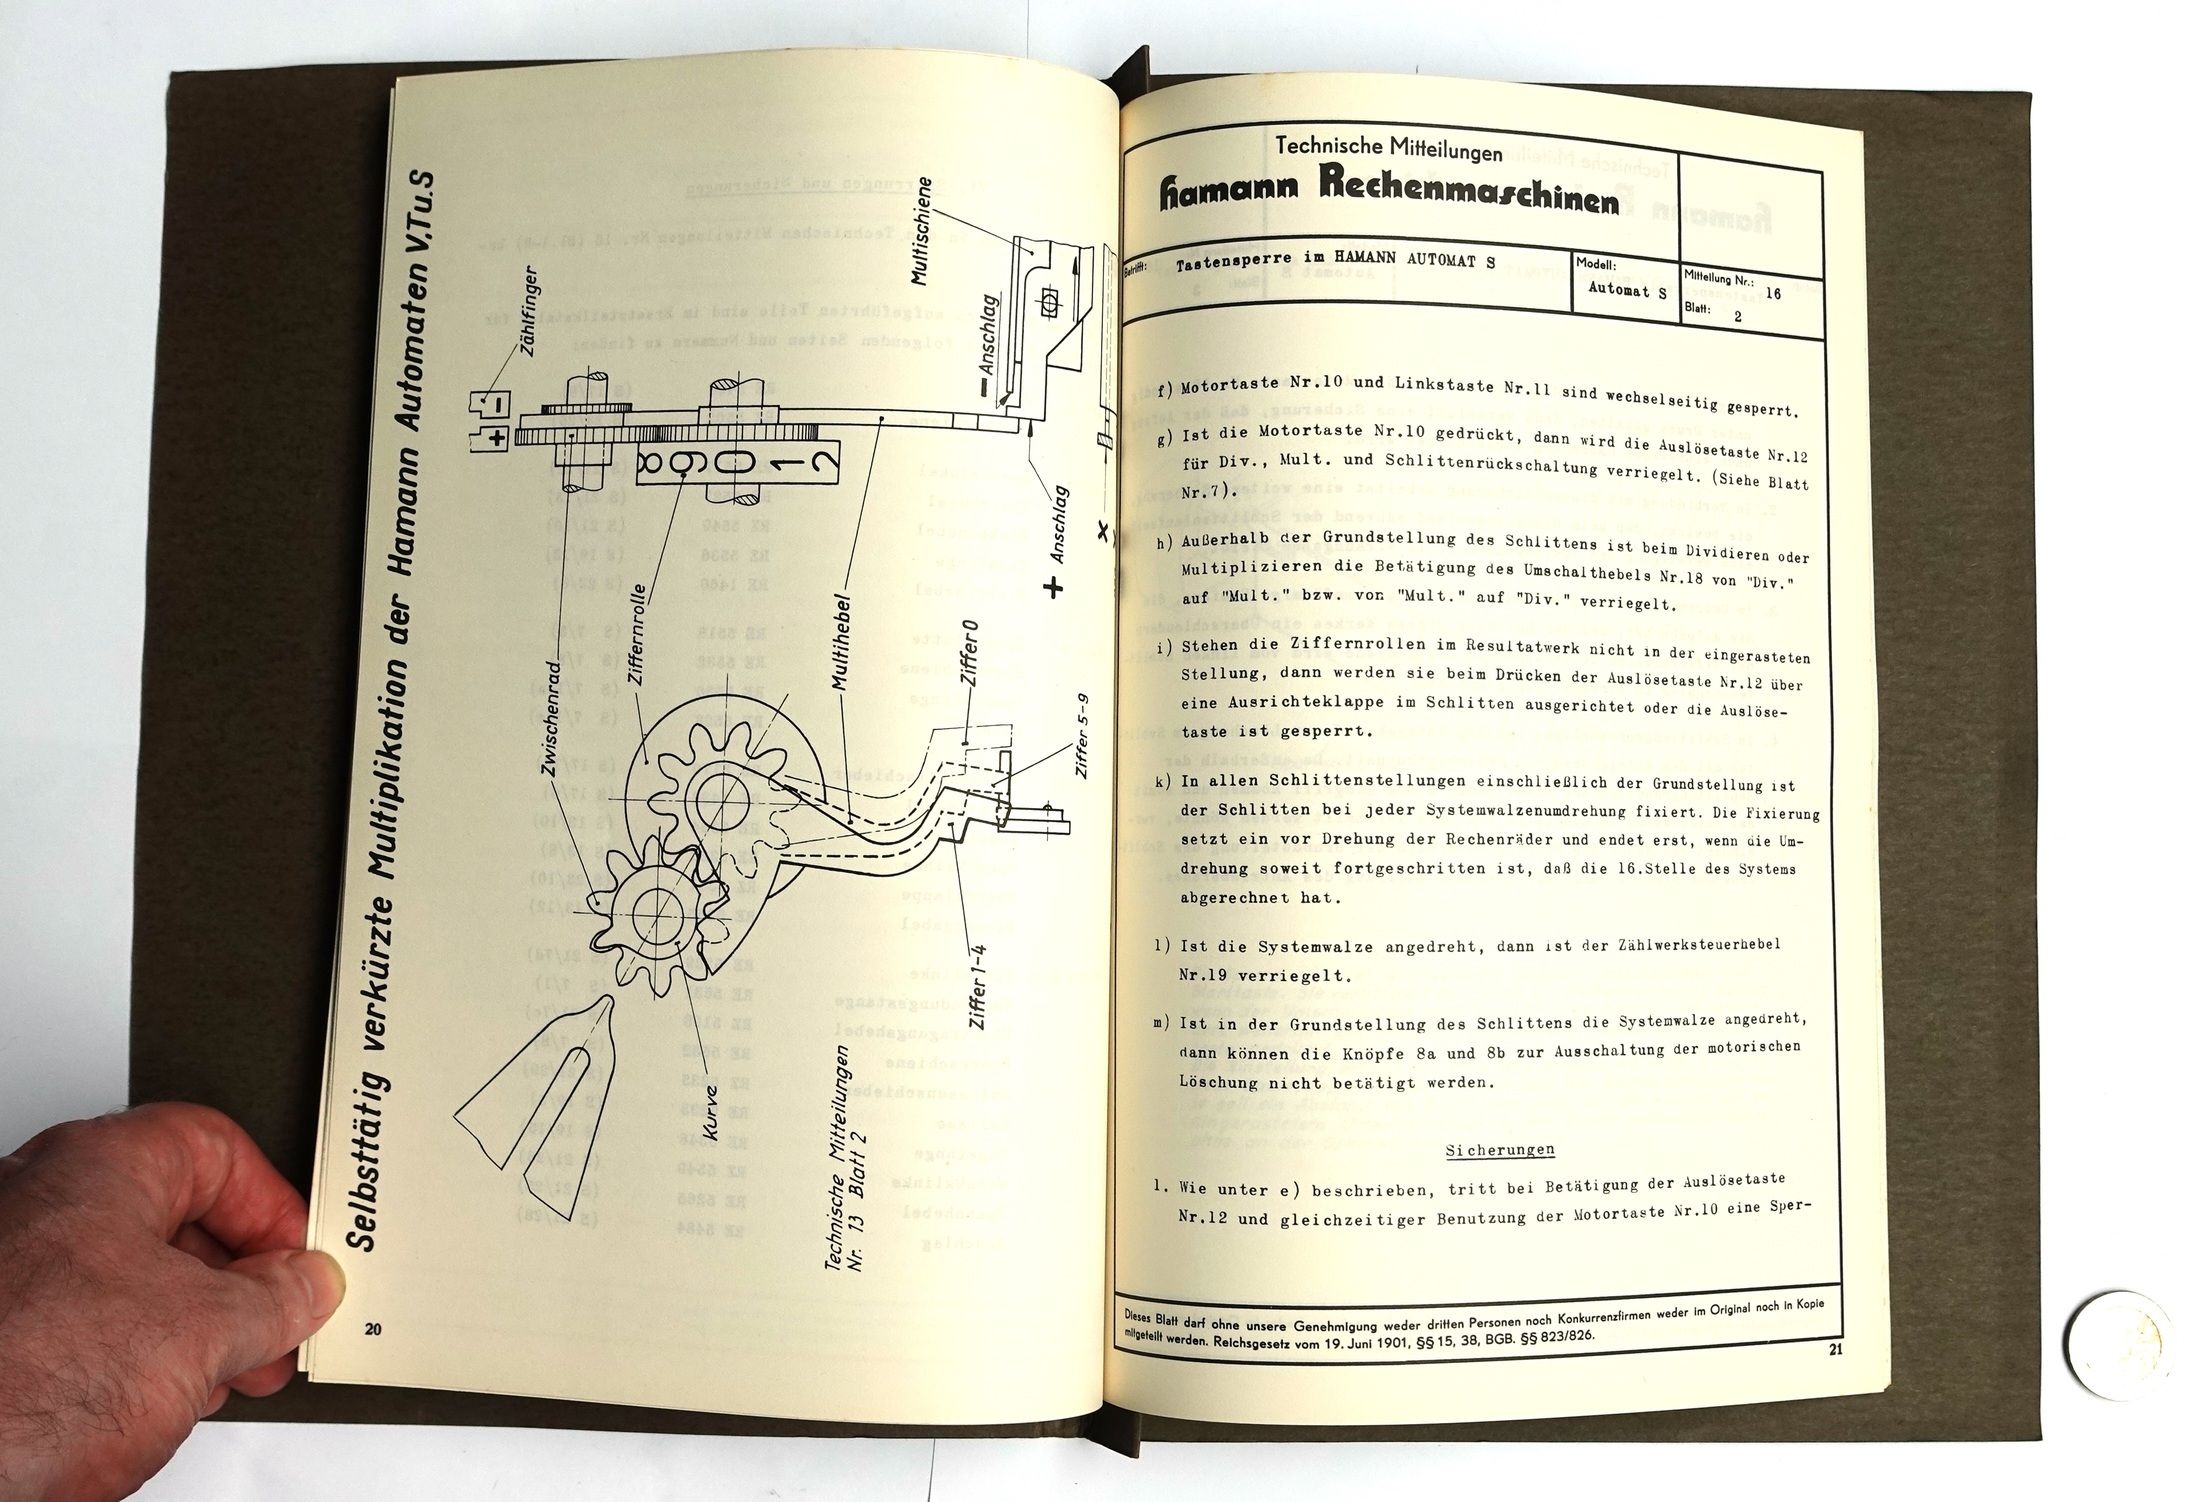
6.5 The drum: clean it in place
The single most repeated piece of advice from people who have restored these machines is do not take the drum out. Bölter on his Manus E: “Quite naively I took the drum out, thinking it would go back as easily as a pinwheel drum — far from it! I spent several hours until it was exactly positioned again and turned freely.” His photograph of it is captioned Einmal und nie wieder ausgebaut, “out once and never again”. The repair manual explains why: nine sub-assemblies at 12° steps, shims at 8 mm, a shaft that bends if the faces are not clean and parallel when the end nut is tightened.
So the drum is cleaned where it is:
- Take the covers off, not the mechanism. On the Manus R, Christian Hamann’s sequence was to remove the lever caps, the covers, the front plate with its 1–8 scale and the two triangles beneath it, and the carriage spring, and then lift the carriage out. The model C differs in detail, but the principle is the same: covers first, photographs of everything, and nothing loosened that holds the drum.
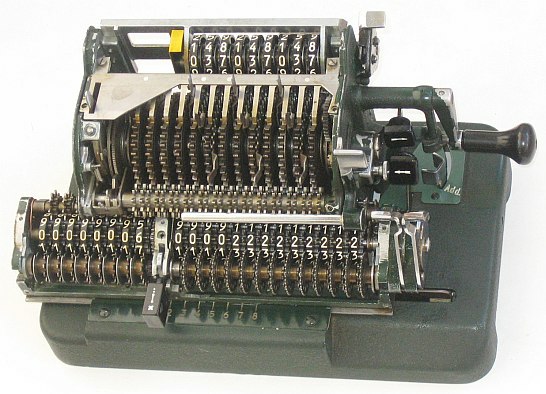
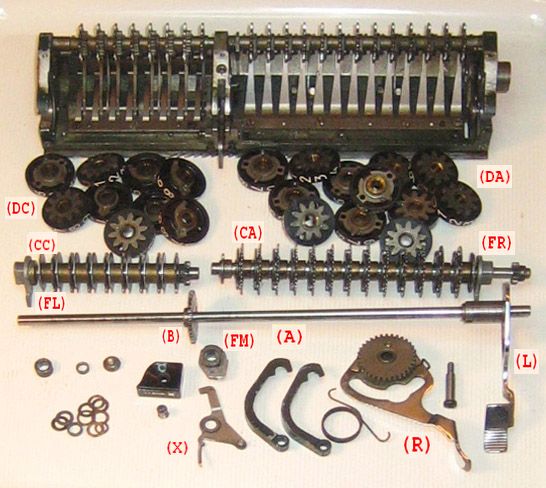
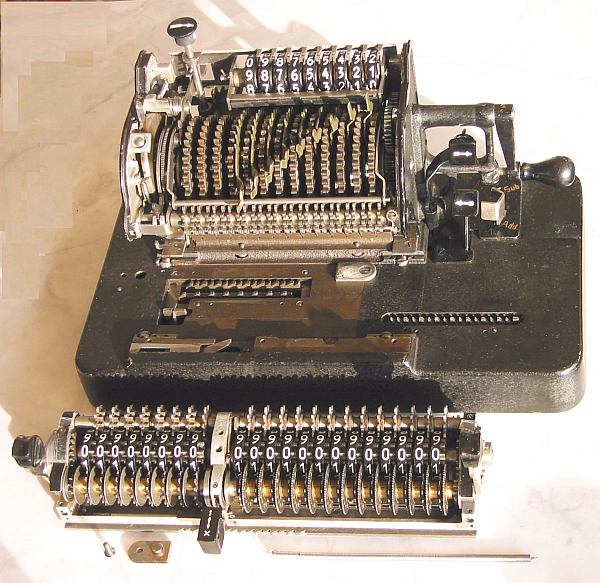
- Flush with a light solvent. Apply it with a brush or a fine squeeze bottle to the pawls, rollers, locking pawls and segments, while turning the crank slowly through complete turns with different settings on the levers. Wolff finds methylated spirits “works as well or better than hydrocarbon solvents” for freeing parts. Other restorers use naphtha (lighter fluid) or petrol with a few per cent of thin oil. Never use WD-40 as a lubricant. If you use it to free something, wash it out afterwards.
- Work every place. Set each lever in turn to every digit and crank, watching that place’s wheel. Every place should take its digit cleanly, and the levers should spring back when the knob is pressed.
- Dry it thoroughly, especially if anything water-based has been used. Steel parts rust quickly.
6.5.1 What not to soak
Wolff’s warning: “Be very careful with solvents in the vicinity of painted surfaces, especially painted dials and numeral wheels … Some calculator paints dissolve in alcohol, some in petroleum solvents, some even in water.” On a Manus that means the figures on the result and counter wheels, the figures on the curved front, the red and white lever caps, and the black finish and the lettering. Test any solvent on a hidden spot first. Felt pads and any wooden case should not be soaked at all.
6.6 Oil: little, light, and in the right places
The repair manual specifies bestes Spezialöl für Büromaschinen, the best special office-machine oil, with grease only on drive gears and leaf springs. For the division-rack slots it says “smooth and oil the bearing slots, but do not grease them”. Restorers disagree about the oil:
- Wolff uses neatsfoot oil on hand-cranked machines, applied sparingly with a needle on pivots and a small brush on gears. He warns that “heavy automotive oils and greases lead rapidly to stiff and sticky operation.”
- vintage-calculators.nl uses 5W-40 motor oil on most parts and clock oil on small ones.
On a switching-latch machine I would follow the light-oil side. Every pawl in the drum is pushed home by a weak spring, and anything that thickens will stop it. A drop on each pivot, a film on the guides, and nothing on the pawls beyond what the solvent leaves behind.
6.7 The base and the loose spring
The underside of a model C, with the bottom pan off, holds the carriage-control linkage: the long double spring that pulls the carriage left, the division rack with its own small spring inside a window in its slide, the levers that the division and transport controls work, and a comb of tongues. On my machine all of these are present and hooked up. The spring that fell out was not obviously missing from any of them.
Where it came from is not yet known. The research for this series found no photograph of the underside of a model A, B or C, no parts list and no exploded drawing of the base. The only open-base photo found is of a later model D, whose base is higher and differently arranged. Hamann’s US patent shows the division rack “constantly urged toward the right … by a suitable spring”, and that spring is still in place on mine. Looking at my photograph, there are three possible empty anchors, all uncertain:
- Upper left: a free-standing post with a grooved neck beside the pivot of the angled arm. This is the most likely, though it looks close, about 21 mm, to the nearest moving pin.
- Right edge: a spare domed pin beside a lever that sits between two stop pins. A spring holding that lever against one stop would make sense.
- Centre: a plain pin on a small plate below the long diagonal lever.
The spring may not even come from the base. It could have dropped out of the body or the carriage when the machine was turned over.
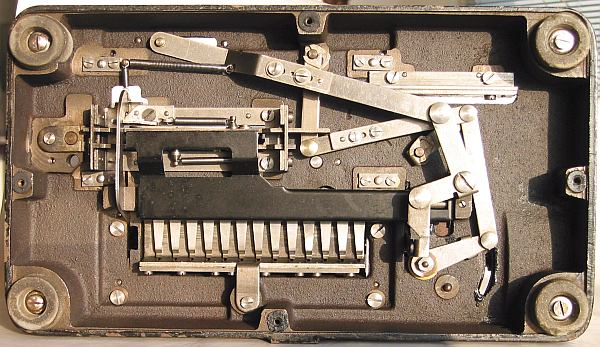
How to find its home without guessing:
- Measure the spring at rest, hook to hook. Its anchors must be clearly further apart than that, typically 10–30 % more for a small return spring.
- Look for a witness mark. A hook leaves a bright, rust-free groove on a post. On a rusty base like mine, an empty post that is bright in its neck is a strong clue.
- Work each control with the pan off: the Add/Sub lever, the division lock, the transport levers, the crank-reverse tab and the clearing position. Watch for a part that should snap back and does not, or that returns only by gravity.
- Ask. A photo of the same corner of another model C would settle it. Christian Hamann, Wolf-G. Blümich and the Rechnerlexikon community are the people most likely to have one.
6.8 Lever caps, paint and other cosmetics
- Lever caps. The red and white caps on the setting levers are often broken or missing on these machines, and the plastic caps on the later models’ buttons “are nearly always missing”. Christian Hamann replaced broken caps with coloured insulating tube. A cap could also be modelled from calipered measurements of a surviving one and printed in red and white. Keep the original colour pattern, because the caps mark the groups of digits.
- Paint. Wolff advises soap and water or a mild cleaner, keeping a surface uniformly wet so that a matt finish does not streak, and a non-silicone polish on gloss. Repainting lowers a machine’s originality. Several machines in the collectors’ lists are noted as repainted.
- Lettering. No decal supplier is known. Waterslide decals can be made from a good photograph of an intact machine of the same variant.
6.9 Help
No firm today advertises Hamann repairs. The people who know these machines are collectors:
- Christian Hamann, Berlin, has restored a C2, a D and an R and documents his work at public.bht-berlin.de/hamann.
- Wolf-G. Blümich compiled the model table and invites corrections at bluemich.net.
- Jaap Scherphuis has the manuals, patents and detailed photographs at jaapsch.net.
- The Rechnerlexikon wiki and the HBw-aktuell collectors’ circle, where the model research was published.
- The Arithmeum in Bonn has a restoration workshop and an animation of the Manus mechanism, though it is a museum, not a service.
A local clockmaker or precision mechanic is the realistic hands-on option.
Comments (0)